Ads
Articles
Searches
No ads have been saved yet.
Your last viewed and saved ads will appear here

Samantha & Herb's Bus Conversion Journey - Part Five | Organised Chaos

We left you last time as we finished off the deck. This week, it’s all systems go inside with many projects all happening simultaneously.  So, bear with us as we walk you through the organised chaos of when a bus build all starts coming together.


While the outside of the bus is looking all but complete with its brand new rooftop deck and fancy new paint job… the inside is at its raw infancy.  First things first, plug all those holes in the floor.  We consulted with our engineer about the best way to do this. The holes were left by the bolts that had either held the seats in place or the diesel heaters.  Note the very random pattern on the floor and the fact that not everything was bolted down.  There were also larger holes evident by the bigger patches and that’s where the hoses for the diesel heaters ran.

Top tip: Ensure you engage the engineer that will certify your bus right from the outset to avoid any nasty surprises when he comes to certify you.  We emailed ours many times during the build just to ensure that we would be fully compliant.  Spoiler Alert: We passed with flying colours!


Each hole was filled with a flexible, waterproof silicone and a small patch was placed on the underneath of the bus, once again held in place by the silicone.  On the inside, the silicone filled the entire hole and once the curing had occurred after 4 days, the bitumen coated aluminium tap was applied to the top to seal the hole completely. You will note that we elected not to remove the original industrial grade vinyl flooring as it was in amazing condition. An inspection underneath of the timber subfloor also showed there were no signs of any decay or damage and we felt it added another layer of waterproof protection.
 
Top tip: Note how the vinyl actually extends up the side of the bus?  We have encountered many builds, both buses and caravans where people have not considered sealing the gap between the side wall and floor.  While it is almost impossible for water to leak up and into the space, I can tell you that the first time you travel along a dusty, dirt road, you will thank me for either leaving your vinyl seal in place or remembering to pay close attention to this very important detail.


While the above process took a few days to cure and there was long wait times, we tackled the next project and that was sanding back, rust proofing, undercoating and then applying two coats of paint to our wheel arches. In all honestly, these will never be seen as they are under the bed, but like all aspects of the build, we wanted to ensure that they were rejuvenated and in tip-top condition, to stand the test of time. We used the same White Knight rust inhibitor, etch primer and Rust Guard top coat paint to complete this process.
 
 
Our garage space was the next priority on the list.  Yes, we call the storage space in the back of the bus a garage, just like in a regular house.  Not only is this where we plan to store all our tools, folding chairs and other camping equipment, but this space underneath our bed is also housing our electrical system and our water tank.  
 
We chose to carpet the entire area in high quality marine carpet for both durability and practicality.  The dark grey is very forgiving of any stain and it is very easy to apply.  We did a dry fit first of the carpet, ensuring that we had a little extra at both the sides and the ends that we could trip if necessary.  Once we were happy with the fit, we used artificial turf adhesive to apply the marine carpet, working in small sections at a time.
 
Top tip: We used our packs of timber flooring to both weigh down the carpet while it dried and also used them to rub across the surface to ensure that we didn’t have any air bubbles.
 

The very next part was one that I had been waiting so patiently for and that was to test out one of the kitchen cupboards!  They say the kitchen is the heart of the home and that kitchens and bathrooms sell houses, so I was so excited for this one single component to be sitting in the bus.
 
Unlike a conventional kitchen which traditionally stands on legs and has a kick plate, our kitchen was attached to the floor using structural and treated framing pine and then the clever Ikea mounting bracket that allows you to literally “hang” your bases cabinets to the wall.  So essentially, our cupboards are bolted to both the floor and wall to stop any movement during travel.  This is one of the heaviest components of the built and you don’t want this moving around.
 
 
Next up, we were back to the wheel hubs now that they are completely dry and we built pine frames over each one from structural and treated pine.  The platform on the left will house our inverter, battery and electrical switchboard. The one on the right is the base for our 120l water tank and water pump.
 
Many people elect to house their water tanks under their bus or caravan and utilise that space inside for additional storage.  However, I had visions of the water tanks becoming contaminated or pierced by something we drove over, so we elected to house it inside.
 
 
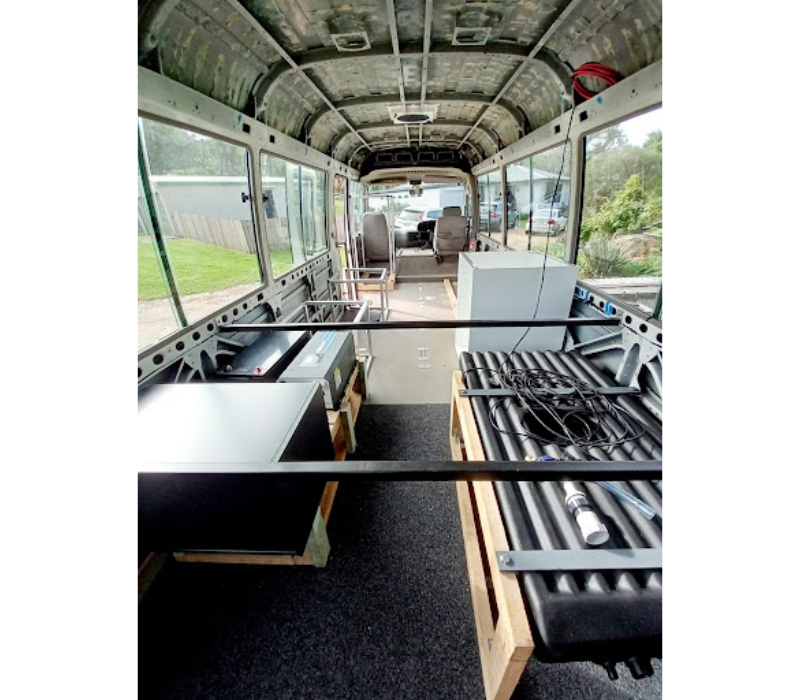
The bedrails were next and in hindsight, probably should have been installed weeks later.  I cannot tell you how many times we had to climb over them and our shins bore the full brunt of not lifting our legs high enough.   We have many bruises to show at this point.  However, it was another important element to tick off the list and ensure that our planning and spacing was correct.
 
We used the same 25mm box steel that we used in our decking frame and bolted these to the side walls.  The spacing of these was determined by the upright supports that we had to bolt them to and also the load capacity weighting of each rail.  
 
The bed slats that go onto this frame have actually been salvaged from an old conventional bed that we purchased off Marketplace for less than $100, but more of that later when we come to install the bed in coming weeks.
 
 
Whilst dealing with all things flooring, there is a hatch near our front door which is the access point for our bus batteries.  These batteries are not to be confused with the battery that is connected to the solar panels on the roof which supplies us with power for lights and appliances.  I am talking about the batteries that actually power the bus, just like in a car.  We have two 12v batteries run in series to power our 24v bus system.
 
I remember removing the panel for the first time a few weeks ago and as I lifted it up, small rust flakes started dropping off and the whole thing rattled.  That rattling was actually more broken and rusty pieces that had fallen inside the frame.  On closer inspection, I could poke holes in it with just my finger, so back to Marketplace to try and find a replacement.
 
Top tip: Wherever possible, we like to find a genuine replacement from the same vehicle that may be used for wrecking, rather than buy an aftermarket part.  This not only saves you so much money (believe me parts are expensive, if you can find them new), but it also means that there is one less piece of rubbish filling up landfill.
 
I couldn’t believe it when I found a replacement in our home state and the new/old hatch had come off a bus that had been wrecked.  It was in a much better state than ours and with a new piece of carpet on the top and our three step paint process, it was better than a new one.  These pictures are of our old hatch and the newly refurbished on.

The very last task on this week’s long list was to finally determine where the old roof lining would be cut back to.  Many people who have Coasters have removed the entire roof lining in the drivers cabin as well as the main cabin.  However, ours was in such great condition, it matched our colour scheme and with Herb being so tall, we liked the additional head height, so elected to keep it in place and not lower the roof height and add in additional storage.
 
This area above us in the driver’s cabin also houses our air conditioning system, which we have kept intact, so it was essential that we didn’t alter this area.  It also had the added bonus of keeping the costs down.
 
 
There were multiple things on this weeks to do list, but as you can see many of them only took an hour or two.  There was lots of time between paint and glue drying, so we made the most of our downtime and tackled many of the foundation items.  If you have read this far, I applaud you, this was a tough one to write with so much going on.  But in the interests of transperancy and so that you get a true sense of the build, thank you for sticking with us.
 
If you have questions about anything that you have seen or read, please reach out via DM on our Instagram page @hello_mr_pemberton (I would love to hear from you!)
 
Until next week…


Samantha Platt
Caravans For Sale Content Contributor
Published on 19-06-2023
Samantha is an Interior Designer by profession who decided that two years ago, there had to be more to life than working the 9-5 grind. She started her professional life with a Degree in Criminology that came crashing down when she wasn't accepted into the police force to work in Forensics due to a physical disability (she is totally blind in one eye). Not to be deterred, she changed pace dramatically and became a flight attendant for eight years and did a further degree in Interior Design and Construction. When the airline she worked for collapsed she once again pivoted and ran her own business, was a retail manager and later became a business consultant, visual merchandiser and then followed her one true passion and became an interior stylist and designer. During all those career changes, Samantha and her husband renovated and flipped houses and apartments... 13 in fact! She became a mother and then decided in 2020 that she would tackle a new kind of renovation... a vintage caravan. Growing up, like many of us Samantha thought that the dream was the large home, backyard, inground pool and double garage. However, as she grew older and wiser, she and Herb started to downsize before realising that some of her fondest childhood memories stemmed back to a cubby house that her father built her when she was just five. Complete with an intercom, curtains, front deck and kitchen, going back to her roots meant a newfound hobby and passion and it ignited something that she proclaims is hard to describe. She certainly takes after her dad and her only regret in life is that she didn't get to know him better and that he is not around to see what a beautiful life she has created and how much of an influence he has actually been. Samantha renovated 'Hunter' (a 1973 Viscount Royal) with her husband and then worked on the renovation flips of 'Daisy' and 'Clementine' with a friend (also vintage caravans). All three were sold and that brings you up to date with the story of Mr Pemberton, the very much loved bus conversion and tiny home that Samantha and Herb now travel around Australia in.